When you’re learning to surf, finding the right kind of waves is half the battle. You need to know what kind of waves are suitable for you, what weather variables create these ideal waves and how to read a surf forecast.
This surf tip is going to teach you some surf science! The info is straight from day 2 of my 5 day surf course for beginners.
Once you’ve read it, you should be able to:
- spend at least 80% of your sessions in suitable waves and therefore learn to surf faster
- predict ‘epic’ conditions up to a week in advance and organise your life around them
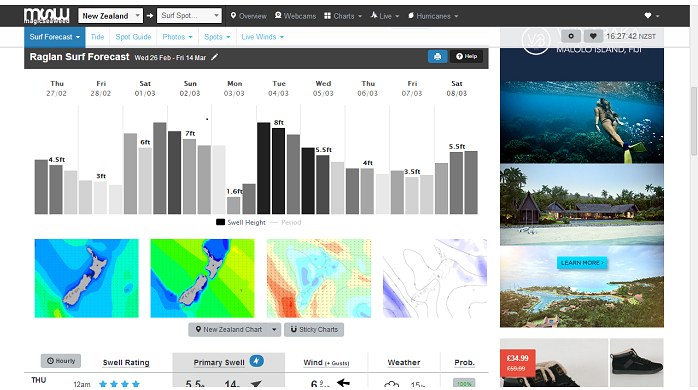
This is the first step. The surf report on the radio may say “it’s 9 out of 10 today”, but, remember those reports are aimed at more experienced surfers. The waves that experienced guys and girls want are not going to be easy for learning. However, what they would regard as flat could be your perfect training ground.
The following words can be used to describe the different types of waves:
- size
- power
- shape
- surface conditions
- speed
- direction
Let’s go through each of these and get an idea of what is suitable for you while learning:
Size is pretty straight forward. How high the wave is from the bottom to the top of the lip. The problem is the way surfers describe the height of a wave. Some use ft; “it’s 2 ft out there”, “some 6 footers coming through”. But, this isn’t actual ft, it’s “surfer’s ft”. What most kiwi surfers call 2-3 ft is actually about 4 -8ft if you were to measure it. It gets even more confusing when you travel – Hawaiian 2ft is actually a lot bigger than a kiwi 2ft, yet an American 2ft is closer to the actual measurement.
I prefer to say shoulder height, overhead, double overhead….it’s a bit less ambiguous. When you’re learning just focus on finding waves of a size you feel confident in. This will depend on your fitness and ocean knowledge. As a general rule anything from waist high to head high will be a safe bet.
Power is sometimes hard to predict until you build experience. It is simply how hard the waves are breaking and the volume of water involved. You get thin waves and thick ones and surfers often say things like “fun” or “heavy” to describe this. Heavy, powerful waves have less margin for error and more consequences so it goes without saying that you want gentle breaking waves when learning to surf.
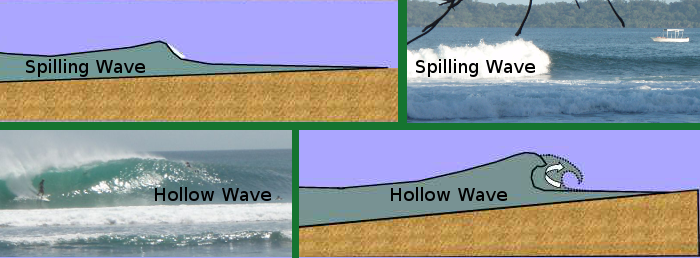
The Shape of a wave is either hollow or spilling as seen in the diagram below. Hollow may also be described as sucky, barrelling, or tubing. Spilling waves are usually just called soft, mellow or fat and those are the ones you want until you learn the skills to handle a steep take-off.
Surface conditions is an easy one. It’s either smooth and clean or choppy and bumpy. The cleaner the better.
Speed refers to how quickly the waves go from a rolling swell to a broken wave and also how quickly they break in a sideways direction e.g. left to right or right to left. The goal of surfing is to surf across the unbroken wave face so a slow breaking wave is going to make it easier for you as a beginner.
Direction is simply left or right. A left breaking wave is one in which the surfer would be going to their left once riding and vice-versa for a right. It’s ok to have a preference when you start out. You may want to focus on right-handers for a while then move on to lefts after that. Up to you.
These variables are:
- Swell – size, direction, period, groundswell vs windswell
- Geography – which direction the coastline or surf-spot faces, local terrain
- Wind – direction and strength
- Profile of the sea floor
- Tides
- Type of Surf Spot – beach break, point break, reef break, rivermouth
The Swell is the most important thing to know about as no swell equals no waves to surf. Swell can be thought of as unbroken waves that are rolling through the ocean just looking for a place where the sea-floor gets shallow enough for them to break. Swells travel huge distances and are essentially created by the high winds of the storms out in the ocean. A ground swell is one that comes from a long way away. They generally pack more power, are more organised, and don’t die quickly. A wind swell is caused by more localised winds and they are generally less organised, choppy and short lived. Both types can create great waves to surf, but, ground swell is usually best.
The swell size and direction need to be looked at together with geography of the coastline you are surfing. If a surf spot faces directly into, say a 3m swell, you can probably expect waves around the 3m mark. But, if a spot faces another direction, let’s say NE, and the swell is 3m from the SE, that swell will have to wrap around the corner to get into the surf spot. In that case you might only expect waves around 1.5m.
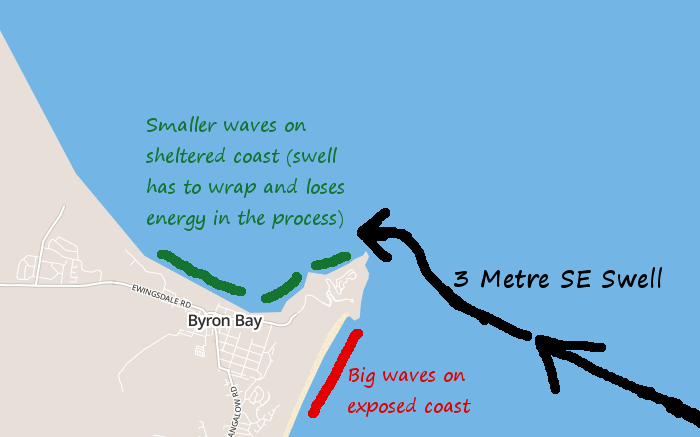
This knowledge is important if you want to find waves of the ideal size for you. If one day you go to a beach and the waves are too big for you, you could probably get in the car and drive to a more sheltered spot with smaller waves that will allow you to improve.
The quickest way to get the knowledge of your coastline and which way the spots face is to get a surf guide book. Read through it and commit all your local spots to memory then enhance your knowledge through your own experiences. The direction a spot faces isn’t all you need to know either. You need to take in the landscapes, hills, and cliffs that surround a spot – they can provide great shelter from the wind.
The final aspect of swell we need to cover is the swell’s period. The period is a measure of time between individual waves and is expressed in seconds. This is useful for assessing whether a swell is a powerful and well organised groundswell, or the lumpier, bumpier wind swell. A period of 10 seconds or more would tend to be ground swell, around 6 seconds you’re looking at wind swell. A long distance ground swell can be up around 20 seconds period.
You may find that a long period swell will be able to wrap into sheltered spots and maintain it’s size better than a wind swell can.
Wind is probably the easiest variable to understand. You need the wind to create the waves in the first place, but you want that to happen as far away as possible, out in the ocean. Then, when those waves arrive at your local spot, you don’t really want any wind at all.
The reason you don’t want much wind is it chops up the surface conditions and this makes it harder for your surfboard to move through the water as you ride waves.
If there is no wind or very little, the direction of it doesn’t matter too much – conditions will be glassy. But, if the wind puffs up you’ll find certain directions are better than others. An offshore wind is when the wind blows from the land towards the sea. This is the preferred direction as it holds up the waves, grooms them, and keeps the surface nice and smooth. As long as the wind doesn’t get too strong, say over 20 knots, you’ll be fine. Any stronger and it will be hard to take-off.
The other winds are either onshore – from the sea to the land, or cross-shore – blowing from either side. If these winds are blowing any stronger than 10 knots it can chop the waves up fast. Some spots may be ok in these winds, especially if there are high hills providing shelter from a side-shore, but you’re going to have more fun when there is little wind or an offshore.
The morning and evening are often the best times to surf because the land is cool and the offshore wind is blowing. As the day heats up, the hot air from the land rises and the cooler air from the sea comes in underneath it, creating an onshore wind or “sea breeze”.
The profile of the sea-floor is also worth knowing. You can tell a spot has a steep profile if it gets deep very quickly. In this case the waves will break closer to the shore and they’ll be packing some power.
Spots that gradually get deeper will often have gentler waves, ideal for learning to surf.
Tides go in and out with high and low being roughly 6 hours apart. Some spots like the low whereas others like the high, but, many New Zealand beach breaks like the incoming tide from mid to high.
You’ll learn how the tides affect your local spots through experience (and guide books), but here are a few rules of thumb:
- Lower tides mean the water is shallower where the waves are breaking. That means the wave shape is likely to be steeper and they will break faster.
- Higher tides mean deeper water and fuller, spilling waves that give you a bit more time to get up and riding
- If you’re still surfing the whitewater waves, you’ll find they are gentler at low tide and provide longer rides. At high tide they will be powerful but short.
The last variable that has a big effect on the waves is the type of surf spot.
The 4 main types are:
- Beach Break – waves come straight in and break over a sandy beach
- Point Break – waves wrap around a headland and break sideways along rocks or sand
- Reef Break – waves break over a coral or rock reef
- River Mouth – waves break over shingle or sand where a river meets the sea
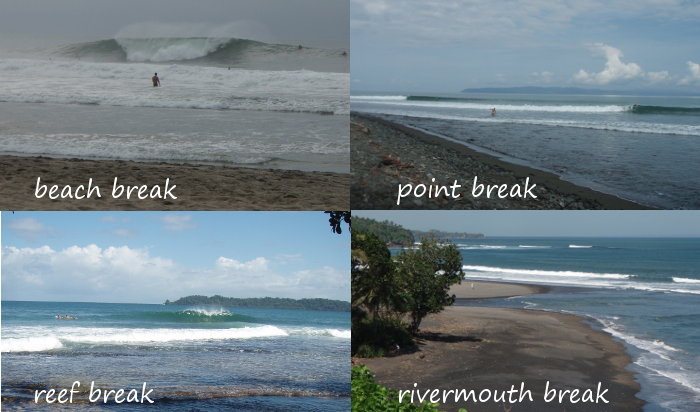
You may have heard that beach breaks are the safe option for learning. This is often the case as you don’t need to deal with rocks, but, some beach breaks are not suitable for learning at all, especially ones that have a steep profile and powerful waves (like the one pictured above actually).
On the other hand you shouldn’t rule out reef breaks for learning to surf. They might seem scary but if it’s a sheltered spot with gentle waves and deep water to the side of the break – it could be perfect for you.
You just have to weigh up each break on it’s own merits to see if the waves are suitable for you. The main one I would caution you on is the river mouth. The currents at these spots can be unpredictable and incredibly strong.
Always check the crowd situation too. Point and reef breaks tend to have smaller take-off areas so everyone ends up sitting right next to each other. As a beginner you need space, so try and find somewhere where you can focus on surfing, instead of dodging others.
Now you know what kind of waves are suitable for learning and the weather and location variables that create them. However, many of these variables change from day to day, hour to hour. So, how do you predict what the waves will be like on any given day?
This is the final piece of the puzzle. Your ticket to scoring good waves regularly and leaning to surf faster.
At this point you’re already armed with knowledge of your local spots. You know which way they face, the landscapes around them, which tides they like, what types of breaks they are, and what kind of waves they tend to produce.
To fill in the blanks and make predictions about the waves, you need the swell info (size, direction, period), the wind info, and the tides. Thanks to surf forecasting websites, you can get all this info at once. There are many different sites out there, magicseaweed, surfline, and buoyweather are some of the big ones. They all have similar information so let’s learn how to read a forecast, then you can start predicting when and where the waves will be good.
I’m going to use swellmap.com as my example report. In my experience it’s really accurate for Raglan, where I live.
Step 1: Select your nearest surf spot
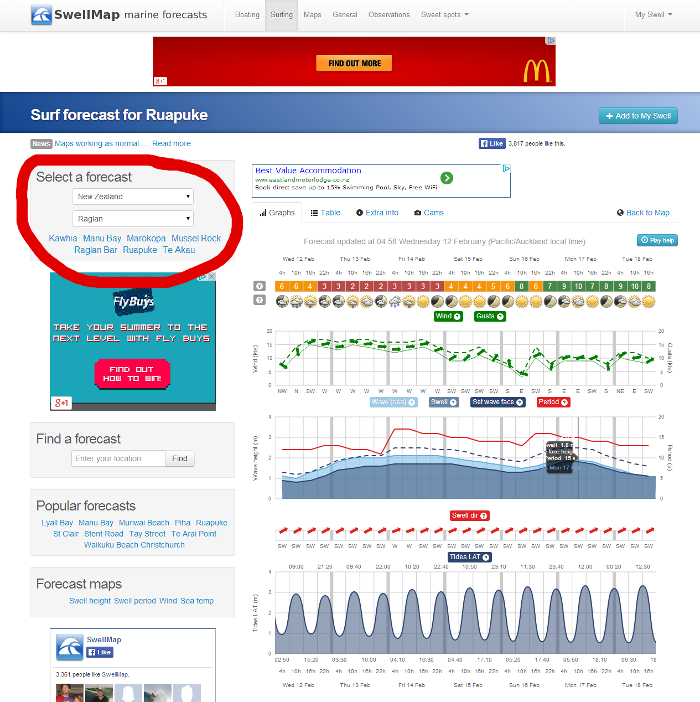
Most surf forecast websites have a drop-down box like the one circled in red below. If possible select the spot you want to surf, if it’s not listed, select the closest one (or one you know faces the same direction). The swell and winds will generally be similar for other spots nearby, but you may have to use your local knowledge as some spots may be more exposed to swell and wind than others.
Step 2: Find the date(s) you are looking for
All forecasting websites present the same information but in different ways. Figure out which days you are looking at first. Forecasts will often show the next 7 days or so in a graphical format. These are useful for spotting when a swell is peaking – they will build gradually, peak, then gradually weaken again until the next swell fills in.
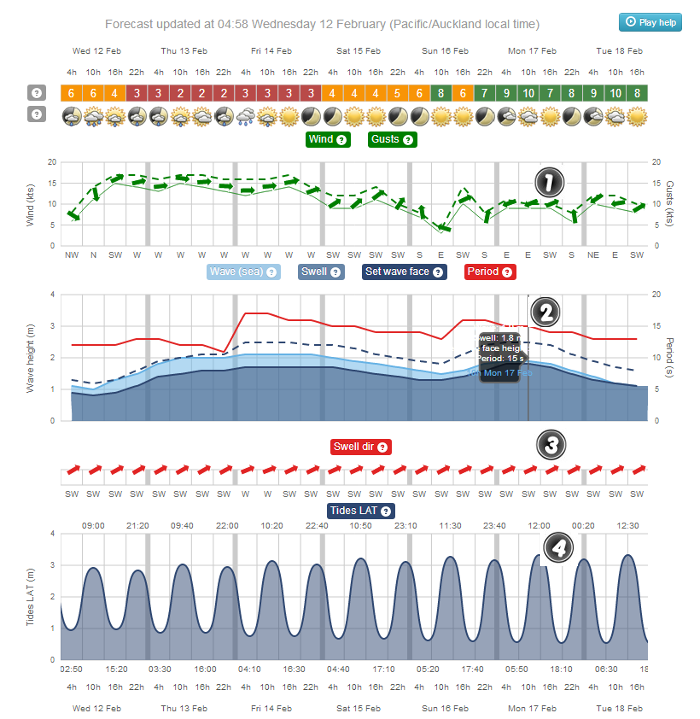
If you only have a particular day free for surfing, you’ll want to look straight at that day. In the forecast below, the dates can be seen at the top from left to right
Step 3: Find the data you need
In this scenario I’m looking to surf a beach named Ruapuke and I’ve loaded that forecast. I already know from experience which way it faces and which winds are favourable. I am free to surf most days so I’m looking at the report to predict when the next oppourtunity for good waves will be.
See labels 1 to 4 on the above image to understand how I use the forecast:
1. I scan across the wind data, looking for the ideal direction and strength. The direction is indicated by the arrows and labels e.g. W or SW. The strength in knots is listed on the side of the graph.
I know that E or NE winds are offshore for this beach. The only window for these ideal winds is Mon 17 Feb.
2. Now that I know next Monday has good winds, I need to check whether the wave size will be OK. From experience I know this beach can’t handle much more than a 2m sw swell – anything bigger and it doesn’t break very well. If it’s a nw swell, I know it can handle a bit more size.
Looking at the swell graph I see three lines, the two I’m most interested in are the dotted blue line which is the ‘set wave face size’ (the size of the waves I’d be surfing), and the red line which is the swell period.
So, on that Monday the dotted line tells me the sets will be about 2.5m, and the red line shows a 15 second period (groundswell).
3. With the swell size and period known, I now need to know the direction. The red arrow tells me it is SW.
So as I mentioned before, my local knowledge tells me that a 2.5m SW groundswell is a little bit too big for this beach. But, I can see that the swell drops during the day, and because it’s only .5m bigger than ideal I’m still considering that the waves could be good.
4. I now need to know what time of day would be good on Monday. Local knowledge tells me this beach is best on mid to high tide so when is that? The last part of the forecast shows me high tide on Monday is at Midday. This means anywhere from 9am to say 3pm could be good.
* Note: some forecasts show the waves as ft, some metres. Some show average wave height, some set wave face height. Make sure you know what you’re looking at.
Step 4: Make your predictions and go surfing
I’m all set now. I’ve combined my knowledge of the local spots, with the data from the forecast, to decide that next Monday after 9 am will be my best chance for the kind of waves I like to surf.
I’m expecting that the waves will be about 2.5 metres high on the sets, and powerful because it’s groundswell. Surface conditions should be clean due to the light offshore wind. The shape of the waves should be quite hollow as I know this beach has quite a steep profile. There will probably be rights and lefts as it’s a beach-break. The speed of the waves should be fine due to the tide being optimum.
All I need to do now is wait, and keep an eye on the forecast as things often change. Predicting conditions a day or 2 in advance is fairly accurate, but, anything more than that and it’s only a probability.
You now know how to find the right kind of waves for learning to surf. So, grab a guide book, build that local knowledge, bookmark a few surf forecasts, and score yourself some waves…

Thank you a lot! That’s super useful
No worries Tanya!
Thank you so much, this was exactly what I was looking for. Very informative. Thank so much
Regard
Ternicia
Hey Glad you found it useful Ternicia, good luck tracking down some good waves.
Thank you! From a 37 year old grommet : )
The best description I have found yet!
Just found this website, and I love it. Adding New Zealand to my trip this September~!
Thank you!
To compare, how will a forecast read when there is no surf or flat water at either high or low tide?
Hey Joshua, on the website I used for the example, swellmap.co.nz, the wave height section will just have a reading around 0 metres or very small eg 0.2 metres if there is no surf. The tide section is a separate matter and usually on another part of the forecast, see the tides graph at the bottom of the swellmap chart.
Thank you for teaching thousands or more people wothout trying to charge them. Your experience is valued beyond money. Thank you.
Great article! Comprehensive description and very helpful!
This is by far the best description I’ve found. Thank you!
I’ve just started surfing a shallow reef break in the Cayman Islands (Caribbean). One of the only local forecasts available is calling for 0.20 m depth at high tide. Is this too little water to safely surf for a beginner/intermediate? I’ve surfed this spot a handful of times now at high tide but it was always around 0.80 m deep. Thanks!
Hi Maria, I’d need to know what forecast you are looking at, but I think the 0.2 m in the forecast probably isn’t referring to the depth at the surf spot. With tide forecasts, the height expressed in metres is relative to chart datum, or the lowest astronomical tide. So it tells you if it’s a really high tide or not, but you then have to use your knowledge of the local surf spots to understand how shallow it would actually be out there. As an example, the tide could say 0.2m but the depth at a surf spot could be much more or less than that, and another spot nearby could have a totally different depth.
SUPER helpful for this newbie . Thanks so much !
No worries, thanks for letting me know!
This is so awesome, thank you for sharing!!
Thank you so much for these valuable explanations ! I am in Morocco with several surf spots around, this will help me to select a good place for beginners ! Cheers, M
Nice 101 on prepping your ride!
Reading this as I’m planning a trip to Ruapuke, so handy!
Sweet! Hope you had a good session
Ah! So glad I found you through Google! Would the choices you made above based off the chart reading be the same things a beginner to intermediate surfer would look at? Or would we want a smaller swell, tide etc?
Yeah as a beginner you’d want a smaller swell size than what I chose. I usually tell people 1m maximum for beginners and even .5m can be ideal, it just makes it easier to paddle out on a big beginner board. If it’s a mellow spot you may be able to handle more size too. Pretty much all the other variables you’d look for the same as what a good surfer would, eg light offshore winds, optimum tide etc. The ideal tides are different for each spot so you”ll need some local knowledge (or online research) about the spots in your area to predict that.
Huge help !! Pretty straight forward to understand!!thanks
No problem, glad it made sense!